Lesson 4 - String Bending
- About Bending
- Licks as Exercises
- Guitar Solo
String bending is one of the most essential techniques for a lead guitar player, when used with taste, it will add a lot of expressiveness to your solos.
An example of string bending:Bending a string allows gradually elevate its pitch.
Bending that raises the pitch for one 1 tone is called a full bend, and for half of a tone - a half bend
Watch me performing a full and a half bend:Most of the time, I find it is more comfortable to use the ring finger with the assistance of the middle one to bend a string.
To begin, Just pick any note you like and start bending the ringing string as I did in the video.
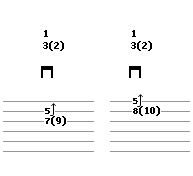
First I performed a full bend at the 7th fret on the 3rd string, lifting its pitch until it is identical to the note that could be played at the 9th fret.
In the second part I played a half-tone bend at the same position lifting the pitch to a note that is located at the 8th fret.
Look at my thumb in this video, this position helps my hand to be more stable while bending:
When you play on the 4th, 5th, or 6th string, you'll have much more space for bending if you do it towards the floor as I did in this video.


The number in the rounded brackets is a reference to the pitch you get when the string is bent, the number 10 means that the bent string should have the pitch of a note located at the 10th fret.
The pitch can also be indicated by characters like: ½, ¼, BU (bend up) or 'full bend' phrase instead of the arrow.
In text-based tablatures bending looks like this:E-------------------------------- B----------------------10b12----- G-------------------------------- D-------------------------------- A---------7b9-------------------- E--------------------------------
The 'b' character denotes the bending and the number after it is a reference note for the pitch.
You will also encounter BD (bend down) notation or downward arrow in some guitar tabs. They both mean that you return a bent string back to its normal state.
Watch video- BU - Bend UP
- BD - Bend Down
It takes practice to start feeling how far to bend a string to arrive to a necessary pitch.
You can easily check the pitch of a bent string by playing an additional, regular note on the nearby higher string that has the same pitch you're bending to, if their pitches match you'll hear a unison.
Here is an example:
Licks as Exercises


Guitar Solo
Now combining all the skills gained from the current and the previous lessons we will play a new guitar solo. This time it's only the sound of electric guitar without a backing track in the background:

The noisy effect at the end of the solo is performed by picking the two strings simultaneously and sliding the fretting hand towards the guitar head with the fingers slightly pushing on the strings:
