Lead Guitar Lesson 1 - Fretting Hand
Positioning the guitar
Take the instrument as shown in the picture
Playing while sitting is easier but standing guitarist looks more impressive and has more freedom, he can jump, run around the stage, lean.
Place your fretting hand as displayed in the picture with the thumb behind the neck
If you're a left-hander, I wouldn't recommend you to invert your instrument as do most of the left handed guitarists, because the left hand is the main hand in guitar playing, so it should be easier for you to start playing guitar without need for any modifications to your positioning and guitar equipment. (I'm a left-hander myself)
Next, aim at the first string and put the fingertip of your 1st finger on the 5th fret and the fingertip of the 3rd finger on the 8th fret:

If it's really difficult for you to reach the 8th fret with your 3rd finger while the 1st finger stays on the 5th fret, or even worse you feel pain in the hand, use your 4th (little finger) instead of the ring finger.
I used only 3 fingers on my fretting hand in these lessons; it is because my pinky finger is much weaker and I feel less control over it than over the rest of the fingers, so I'd need to make more afford to accurately close any given string with this finger.
On the other hand, using the pinky finger in your playing will allow you to avoid some unnecessary stretching and play "4 notes on one string" passages more efficiently.
You don't have to copy my way of playing, play as it feels more naturally and comfortably to you. By the way, I put this lessons online long time ago, and since then I returned to "4-finger-fretting".
top of page
Motion 1 - Pull Off
To perform this:
- press your 1st finger at the 5th and the 3rd finger at the 8th fret on the 1st string
- Take off the 3rd finger away from the string (for about half an inch) in a slightly acute way while keeping the 1st finger in place
This should make the string sound. You might need some practice to to achieve sure and clean sound.
Generally, when you playing guitar, try to mute unused strings when you can to prevent undesirable noise.
For instance: if you play on the 2nd strings, keep your 1st finger in a way that it touches the 1st string:
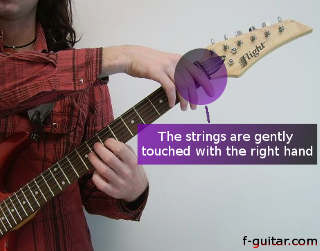
Optionally you can place your picking hand across the all strings behind the fretting hand as shown in the picture, this will mute the unused strings preventing them from contributing to the undesirable noise. It might come in handy when you use a high gain distortion effect.
It looks unusual. Just touch the strings, no need to push them.

Motion 2 - Hammer On
To perform this, just hammer your 3rd finger at the 8th fret, this will make the string sound. Try to do the same exercise on different strings and frets.
When playing warming up exercises you might turn the distortion effect off, it helps to hear what exactly is going on under the fingers.
Combining both motions together
Now it's time to play the 2 little pieces together, creating a loop:
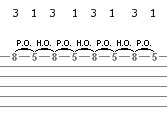
It's super simple, just play pull off, hammer on, pull off, hammer on... slow and steady. Aim to play both motions with the same timing and volume
When you feel you manage playing the loop accurately and clean, a little increase your speed.
Remember the playing should be fun, no pain.
I know, for a first time it might seem extremely hard to keep all these things I said in your mind simultaneously. Remember, it's just a temporary condition, you'll gain control over your hand with some practice and after that this drill will come out automatically with no difficulties.
No Fears.
By the way when you're exercising, it's a good idea to synchronize your playing with a metronome or a drum track.When you feel you are ready to continue, let's go to the next level - preparing to play your first guitar solo
SIDEBAR
A primer on guitar tablatures
In guitar tabs HAMMER ON usually denoted with the H.O. abbreviation
and/or legato symbol

 1-----------------------
 2-----------3h5---------
 3-----------------------
 4-----------------------
 5-----------------------
 6-----------------------
It says - play the note at the 3rd fret and hammer on at the 5th fret.
A PULL OFF can be marked with the P.O. abbreviation along with or without the legato symbol as well

In text-based guitar tabs the "p" character used, like this:
1-----------------------
2-----------10p8--------
3-----------------------
4-----------------------
5-----------------------
6-----------------------
It says play the note at the 10th fret and pull off to the note at the 8th fret.


You can play these patterns on different frets on the fingerboard, connect one with another, modify them as you see fit, after some time you might come up with an interesting guitar lick of yours.
Watch videoIt makes sense to rationally use your moves and minimize them as you go from string to string and run around different frets, because: the shorter your road - the faster you'll be able to go.
While playing slowly try to move from one note to another quickly.
top of page
First Guitar Solo
If you feel you're doing well and ready to take your playing yet to another level, I'll show you how to utilize what we've already studied here in the guitar solo:
The backing track to play along with:
To download the backing track, here is the ogg and here is the mp3 audio file.
First half of the solo I play this lick:
 top of page
About Improvisation
In the second half of the solo I begin to improvise
that means I do not have a concrete sequence of notes in my mind or a written down tab to play from. I create patterns in “live mode” as it comes on my mind and/or to my hands while I perform.
The easiest way to start improvising is to master the licks I gave you in the exercises, play them along with the backing track, run them one after another in different combinations, and after that feel free to experiment with the speed, pausing, phrasing, adding other notes to them, creating your sequences of notes, etc...
All that sounds well with the backing track is good. After some time you'll develop your own improvisational style.


